")
Thanks for purchasing our inductive Proximity Limit Switch Kit.
The following instructions go over the hardware and software settings required to set up Homing (including auto-squaring of your gantry for dual-drive machines) and Limits with our inductive proximity switches.
The switches themselves are fairly simple, but setting up the coordinated motion of the machine for homing is best done with the following step by step approach.
On machines with slaved axes, it is particularly important to verify which axis is the primary Y, and which is the slaved Y (generally the B axis, however in some cases the A axis, depending on the controller you have), as the Y and slave Y sensors (again, B or A) need to be matched with the correct axis of motion for auto-squaring.
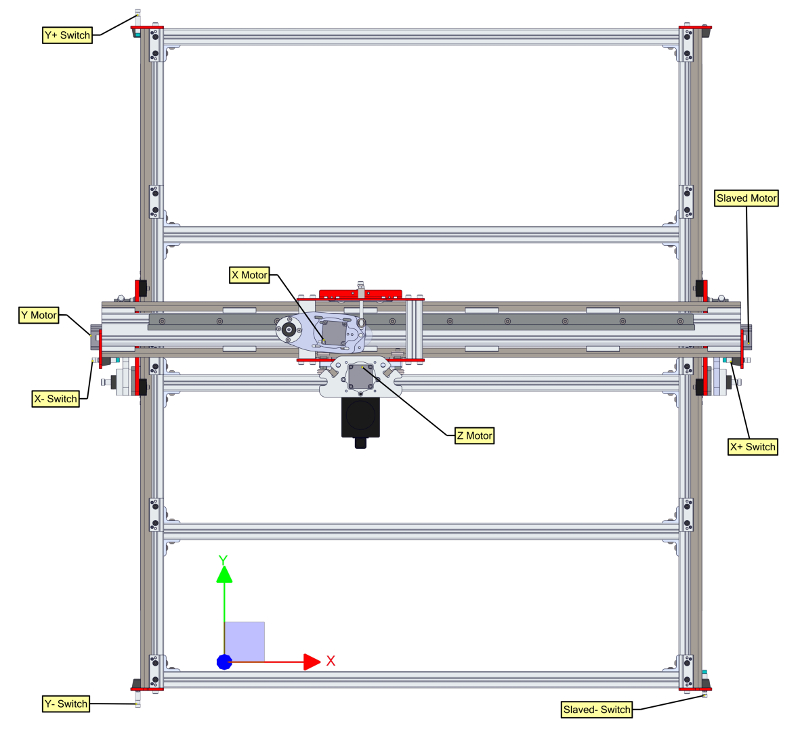
The diagrams below show the correct installation of motors and sensors on the machine:


The up and down arrow keys should cause your gantry to move back and forth along the Y axis, the left and right arrow keys should move the Z carriage side to side along gantry (X axis), and the page-up and page-down keys should move the Z axis up and down.
See the diagrams below for the correct machine coordinate system:


- When you press the up arrow key, the gantry should move towards the back of the machine (away from you), and your Y digital readout in Mach should count up (positive direction).
- When you press the down arrow key, the gantry should move towards the front of the machine (towards you), and your Y digital readout in Mach should count down (negative direction).
- When you press the left arrow key, the Z carriage should move to your left (towards the Y axis), and your X digital readout in Mach should count down (negative direction).
- When you press the right arrow key, the Z carriage should move to your right (towards the slaved axis), and your X digital readout in Mach should count up (positive direction).
- When you press the page-up key, the Z axis should move up (raise away from the table), and your Z digital readout in Mach should count up (positive direction).
- When you press the page-down key, the Z axis should move down (towards the table), and your Z digital readout in Mach should count down (negative direction).
Please note, if you change this pin for Y, you will also need to change it for your slaved axis (either B or A)! Otherwise the two sides of the machine will try to move in opposite directions.
For rack and pinion drives, the direction pin setting for the Y and slaved Y motors will be opposite one another, as the R&P drives rotate opposite one another. For Benchtop systems or other dual screw systems, the Y and slaved Y direction bits will be the same.

| Physical Sensor | Purpose | Note |
|---|---|---|
| X- | X- limit, X Home | Sensors X- and X+ will be plugged into the same input port on your controller |
| X+ | X+ | |
| Y- | Y- limit, Y Home | Sensors Y- and Y+ will be plugged into the same input port on your controller |
| Y+ | Y+ limit | |
| Z+ | Z+ limit, Z Home | |
| B or A | B or A (Y slave) Home | Sensor B/A is used for auto-squaring the gantry during homing, so needs its own port on your controller |
CRP800 Pre-wired Systems
For our newest pre-wired electronics systems, which feature M12 terminals for the inputs, each sensor has its own port (X+, X-, Y+, Y-, Z, and SLAVED). On these systems, the Y axis is slaved to the B axis, so all setup for the slaved axis (both motor and sensors) should be for "B" in subsequent instructions.
CRP500 Pre-wired Systems
For older pre-wired electronics systems with locking stereo connectors for the inputs, use one of the provided splitter cables to plug the Y+ and Y- sensor cables into the first port (labeled “Y”), and the other to plug the X+ and X- sensor cables into the second port (labeled “X”). The slaved sensor cable will plug directly into the port labeled “A” without a splitter. Note, you must use the provided stereo splitter cable here – mono splitters will not work and may short the 12V power line.

G540
For G540 based systems, see our specific instructions for this control system.
For older PMDX-126 based NEMA 34 systems, you will use the provided 3 pin connectors to install the sensor wires, per the following standard NPN sensor color codes:
- Black = Signal
- Brown = V+ (12V)
- Blue = Ground
- White = Not Used


On the inputs that are shared, the wire ends of two sensors can be wound together and then inserted.


For Ethernet based systems, the screen to use for this is the “ESS Data Monitoring” screen, available from the “Plugin Control” menu, and shown below:

In this screen, you should see a checkmark disappear in one of the input checkboxes when a sensor is actuated. You can place any piece of metal in front of the sensor to actuate it. You should see 3 different signals toggle, one for X sensors, one for Y sensors, and one for the B or A sensor. Take note of the input signals that toggle for each sensor, as these will be used when you assign the signals for homing and limits later. If you have one of our Plug and Play electronics packages and XML files, these pins should be pre-configured for you, but it is worth verifying the signals to make sure they are correct.If you have an older, non-Ethernet system and are using the parallel port for control, you can use the Diagnostics (Alt-7) screen to identify your signals, although the pins are not well labelled. You can use the legend below to identify the pins that are being triggered. The blocks representing the signals will be green, and then will go black when a sensor is triggered. Note, these indicators do NOT work when you are using Ethernet for control, and will all be black in this case, which is why we recommend using the ESS Data Monitoring screen instead.

Now that your sensors are installed and the pins associated with them are known, it is time to assign these functions in Mach. Go the Config->Ports and Pins->Input Signals tab. Using the pin numbers you determined in Step 4, above, you will want to enable and assign one pin number for X++, X--, and X Home, another for Y++, Y--, and Y Home, and finally the last pin number for your slaved axis Home, A or B depending on your controller. For each of these signals, you will want to make sure the signals are set to “Active Low”.

Your screen should look like the one above, except you will assign the pin numbers to match those from your testing in Step 4.
Once you have the hardware and pins assigned correctly, you will want to set your machine up for homing and “Soft Limits”, which restrict motion of the machine to safe locations after homing. To do so, go to the Config-> Homing and Limits screen.
You will want to set this screen up as shown below generally, but with a few modifications based on your machine size:

This screen is set up for a PRO4896 system. For smaller systems, you will want to change the X soft limits.
When you press the “Ref all Home button”, the machine will home the Z axis first (on systems with a Z sensor), then the Y and Y prime (slave) axes simultaneously, and finally the X axis.
When each side trips the sensor on its respective side, it will stop and back off the sensor. Check the squareness of your machine after homing, and make any necessary adjustments by threading the sensors in and out of their brackets, then re-homing.
Your machine is now homed in “Machine Coordinates”, which can be thought of as the absolute coordinates of the machine. To see what the machine is reading in “Machine Coordinates”, click the “Machine Coord’s” button, which should highlight with a red border. After homing, the X and Y coordinates should read 0, and Z coordinate (on systems equipped with the Z sensor) should read a positive number (depending on your specific configuration).

When you actually start to run G-Code, you will probably want to switch back to “Work Coordinates”, which can be thought of as temporary offsets from the main “Machine Coordinate” system of the machine. To do this, click on “Machine Coord’s” such that the red border disappears. Your G-Code will run relative to this coordinate system. It’s fine if your work coordinates and machine coordinates are the same, and in this case you will be cutting relative to your absolute machine origin. However, in many cases it can be helpful to set up your program somewhere else on the machine, and by editing work coordinates, you can shift where your program will cut on your machine, but the machine will still retain its absolute position.
To enable Soft Limits, which inhibit the machine from moving outside of the limits you have set, you will need to click the “Soft Limits” button such that a green border appears around it.

A)You may have your Y and slaved Y sensors reversed relative to your motors. Verify your pin assignments match the diagrams shown in Step 1.
Q)My machine is in a limit, and won’t allow me to move!
A)You will need to temporarily override the limits to re-enable motion. This can be done from the “Settings” tab by clicking the manual limit override button. This will allow you to re-enable your machine and drive out of the limit.

Q) My machine is moving away from the home switches during homing instead of towards them.
A) You may have the motors on the wrong side of the machine (see Step 1), or you may have their direction pins configured incorrectly. To change the direction of a motor, see the instructions at the end of Step 2.
New in: Archived Instructions